Slann
Aginor
Fifth Spawning
- Messages
- 12,256
- Likes Received
- 20,177
- Trophy Points
- 113
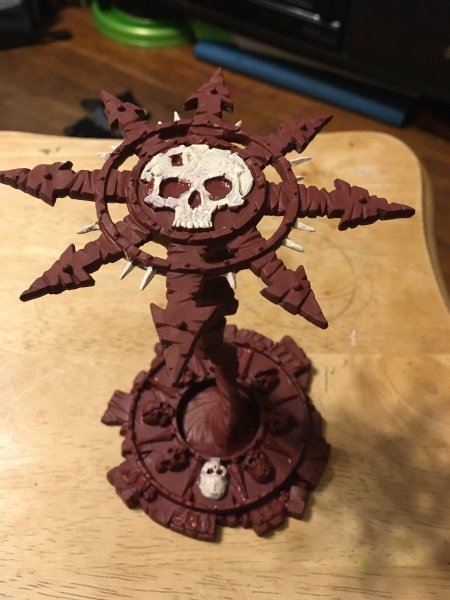
Definitely an improvement, many parts now have better coverage of the paints and you cleaned up some of the spots where the paint didn't follow the lines of the model.
What really needs some more basecoat work is the bright parts such as the horns.
Keep in mind that painting a very dark color over a bright one or vice versa (in your case especially the blue, white, and light brown) often requires several coats of paint to properly cover.
Try to carefully build up the layers (always waiting for it to dry and then add another coat) until there is no black showing through anymore.
I see you used a light brown to drybrush the white bone.
It looks like the drybrush worked in principle, as you see it puts the color just onto the raised areas. I am sure you already noticed how it makes the areas look more detailed than you actually are able to paint directly (at least without being very good in edge highlighting, but that's for another lesson), and that's exactly what the technique is good for.
Now, the "problem" with that is that usually the goal is to make the raised area a lighter color, as if light catches on it, while making the recesses darker using a shade. You occasionally want it to be the other way round but that's not the norm.
I think the effect it has on the white, making it look less uniform and more like the rotting bone it actually is, adds to your model. In the future you will most likely change that recipe a bit, but I'd say it is an improvement over the plain white you previously had.
Ok, so while you work on your basecoat a little more I'd like to tell you a bit about a thing some people call "color recipes" or "material recipes".
It basically means that for every material you want to paint you make a recipe what colors and techniques you are planning to use. That helps you to get the materials look consistent when you paint another model.
Here are a few examples of material recipes I use:
Bone/Claws/Horns
- basecoat AP Skeleton Bone
- shade AP Soft Tone
- drybrush AP Brainmatter Beige
Stone:
- basecoat AP Uniform Grey
- shade AP Dark Tone
- drybrush AP Ash Grey
- if brownish tint is desired: shade AP soft tone
Blue Seraphon skin:
- basecoat AP Crystal Blue
- shade AP Blue Tone
- drybrush GW Temple Guard Blue
Kroak's bandages:
- basecoat AP Leather Brown
- shade AP Dark Tone
- drybrush AP Skeleton Bone
- if drybrush too bright: shade AP Soft Tone
Ghost green:
- basecoat AP Matt White
- shade AP Green Tone
- heavy drybrush AP Matt White
- glaze GW Waywatcher Green
- light drybrush AP Matt White
On each step I name the technique and then I name the color I use, which consists of an abbreviation for the paint company (AP for Army Painter, GW for Games Workshop and so on) and the actual name of the color it has on its label.
As you see I always start with the basecoat, then shade, then drybrush, and occasionally there would be another shade or drybrush after that.
Some recipes consist of just two steps, while others have four or more, like the last recipe which also has a glaze and two different drybrushing steps.
There are also optional steps sometimes, if two recipes are very similar to each other.
You can see a similar thing in the "Citadel Paint" app by Games Workshop. Of course they only use GW color names, but when searching for a recipe I often browse through that app, looking for a part of a model that roughly looks like what I am trying to paint, and then I search my available colors for the one that is closest to the GW color in the app.
")