-
The forum software have been upgraded to the latest version.
If you notice anything that looks off, or does not work, please let us know.
For more information, click here.
You are using an out of date browser. It may not display this or other websites correctly.
You should upgrade or use an alternative browser.
You should upgrade or use an alternative browser.
Tutorial How to sculpt lizardmen: All your base...
- Thread starter Rikard
- Start date
Stegadon
Rikard
Well-Known Member
- Messages
- 929
- Likes Received
- 1,464
- Trophy Points
- 93
Small note/update for you all.
Once I've finished Gor-rok, I am going to be working on some conversions for you, I'll finish off my cold one riders, plus bastilodon and then start some of the others I've been promising like ripperdacytls, carnosaur change, Stegadon (HUGE conversion project) and then a dread saurian conversion at the end of it all to top things off.
There will of course be other bits and pieces here and there and the order may shift slightly, especially as I owe woogity a salamander piece (just need a little time to think of some new ideas/style changes).
I know things seem very bleak with the end of time rumours, but I hope even if many of you do finish with your Lizards you'll at least be able to take something positive and enjoyable away from it all.")
Once I've finished Gor-rok, I am going to be working on some conversions for you, I'll finish off my cold one riders, plus bastilodon and then start some of the others I've been promising like ripperdacytls, carnosaur change, Stegadon (HUGE conversion project) and then a dread saurian conversion at the end of it all to top things off.
There will of course be other bits and pieces here and there and the order may shift slightly, especially as I owe woogity a salamander piece (just need a little time to think of some new ideas/style changes).
I know things seem very bleak with the end of time rumours, but I hope even if many of you do finish with your Lizards you'll at least be able to take something positive and enjoyable away from it all.
Stegadon
Rikard
Well-Known Member
- Messages
- 929
- Likes Received
- 1,464
- Trophy Points
- 93
Got some more things to show as I'm trying a few new ideas and styles.
I'm still tweaking the toes on the back foot, but I'm taking a little more time with these as feet are something I've tended to rush with the Lizards in the past and I have no intention of keeping this bad habit up.
He's going to be tall.
- I've also started work on the shield (I do have plenty of other WIP shots but am saving these for a full tut), it's going to be large too.
- Really happy with the head.
- I've been playing around with the tail and this one will rank up too.


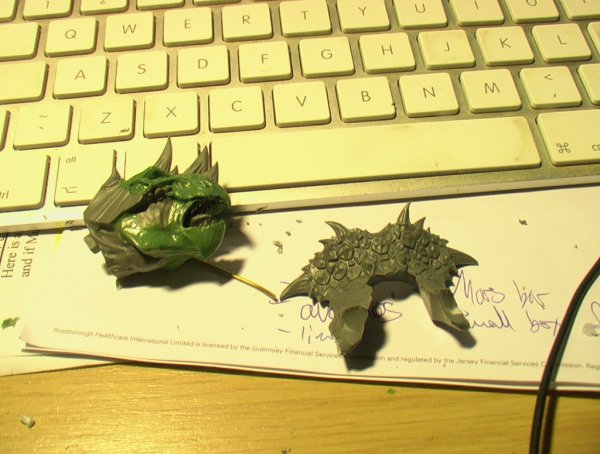
I've also got this:

Which I'm going to do a big tut on converting into this:

It's going to be a large and long tut on that Stegadon as there's so much that needs changing.
I'm still tweaking the toes on the back foot, but I'm taking a little more time with these as feet are something I've tended to rush with the Lizards in the past and I have no intention of keeping this bad habit up.
He's going to be tall.
- I've also started work on the shield (I do have plenty of other WIP shots but am saving these for a full tut), it's going to be large too.
- Really happy with the head.
- I've been playing around with the tail and this one will rank up too.
I've also got this:
Which I'm going to do a big tut on converting into this:
It's going to be a large and long tut on that Stegadon as there's so much that needs changing.
Skink
talocofxhotl
Member
- Messages
- 42
- Likes Received
- 15
- Trophy Points
- 8
Hey, I'm loving the work you've done so far! Would your sculpting possibly extend to a new unit?
I can't get the idea for heavy cavalry Lizardmen out of my head and Saurus on Pachycaphalosaurus would be a dream come true.
http://crexsblogdomain.blogspot.co.uk/2012/05/even-buttheads-get-boo-boos.html
http://www.escapistmagazine.com/forums/read/18.397716-Poll-Whats-Your-Favorite-Dinosaur?page=2
Impact hits and decent strength - if GW lose lizards ever this is whats going into my homebrew armybook!
Even if not it would be a cool sculpt
Stegadon
Rikard
Well-Known Member
- Messages
- 929
- Likes Received
- 1,464
- Trophy Points
- 93
I did toy with the idea of a Lizardmen MC unit for a while (ages ago), though it was for a revamp of the Horned ones, something with 3 wounds and D3 impact hits each.
Not massively sold on doing Pachycaphalosaurus cavalry, that would take me soooooo long to do and I personally think it would be more fun sculpting an entirely new unit, rather than existing dinosaurs.
Not massively sold on doing Pachycaphalosaurus cavalry, that would take me soooooo long to do and I personally think it would be more fun sculpting an entirely new unit, rather than existing dinosaurs.
Stegadon
Rikard
Well-Known Member
- Messages
- 929
- Likes Received
- 1,464
- Trophy Points
- 93
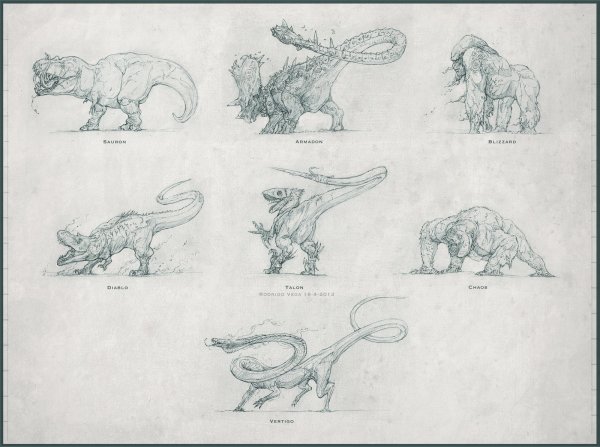
I've finally made the move to begin converting my stegadon kit into something I wanted to have in my army (before it gets canon sniped on turn one). A good start point always comes from inspiration, which in this case comes in the form of the work done by rodrigo-vega (he's on deviantart), his work is espresso for the mind, his style is unique and exceptionally thought provoking.
This piece here is my starting point, I loved Primal rage as a kid and his work with it makes it all the more awesome.

The pose for Armadon was what grabbed me, the tail, the body, it really stands out, so I decided to emulate it using the pieces I already have, though this does require a large amount of chopping and changing (miniature chop shopping, but without the cars).
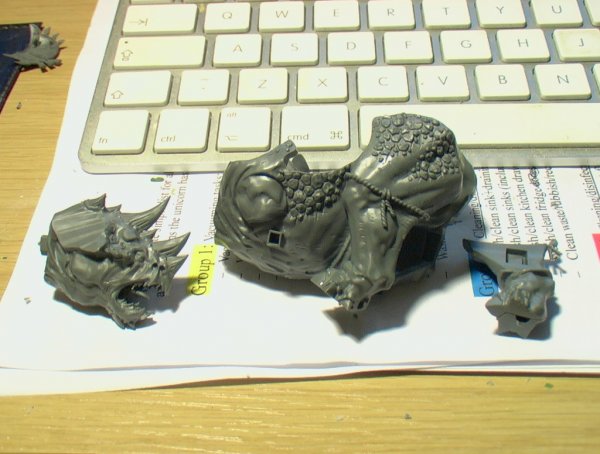
First part is nice and easy, stick bits which you need to go together, together.

Next stage requires drilling holes through the limbs and inserting brass wire before gluing and sealing them in place with glue and putty (apoxi sculpt).

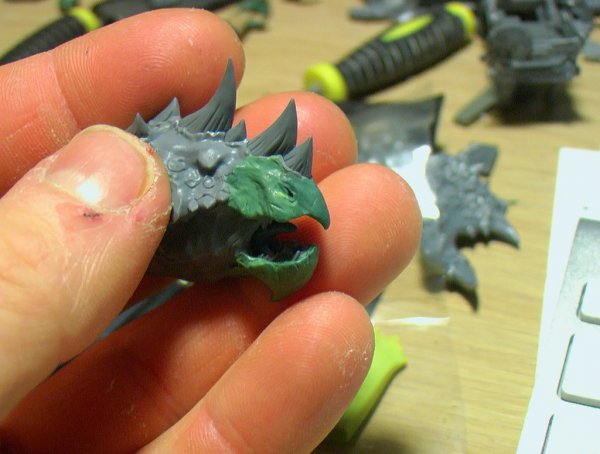
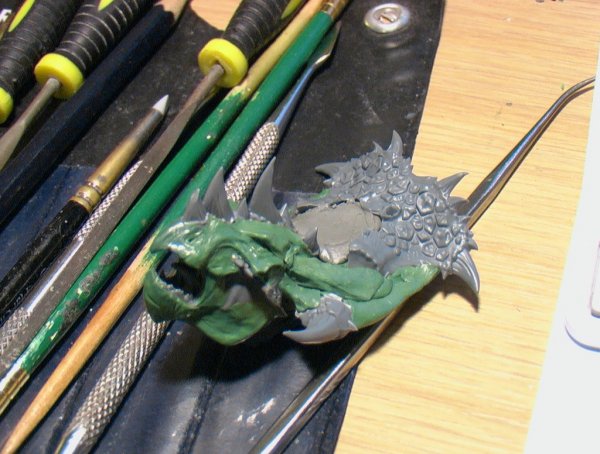
Whilst waiting for this to dry I begin to change the head, bringing it back more to the original design of a frilled dinosaur, this not only includes the beak, but also moving the eyes to a more protected/realistic position on the head.

I begin to add contours and textures, as well as pits to the peak for nostrils.


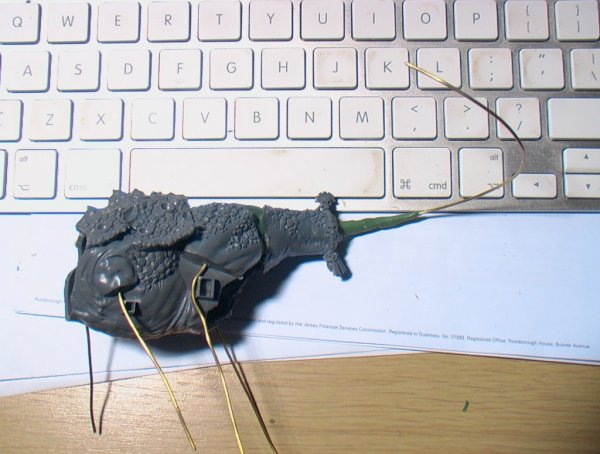
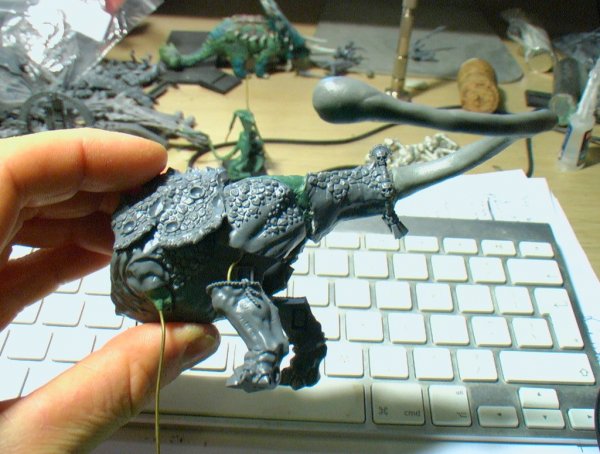
Moving back to the rear end, I pin the legs on to the brass wire, leaving loads of space and gaps, but these (like the angles of the feet, detail and bony landmarks) will be getting sculpted on to and over at the detail stage. For the moment the focus is to simply build up a rough armature. Layers are applied with apoxie sculpt (far cheaper, easier and quicker than using green stuff at this scale) on top of thicker brass wire and then manipulated and re-shaped as it hardens.

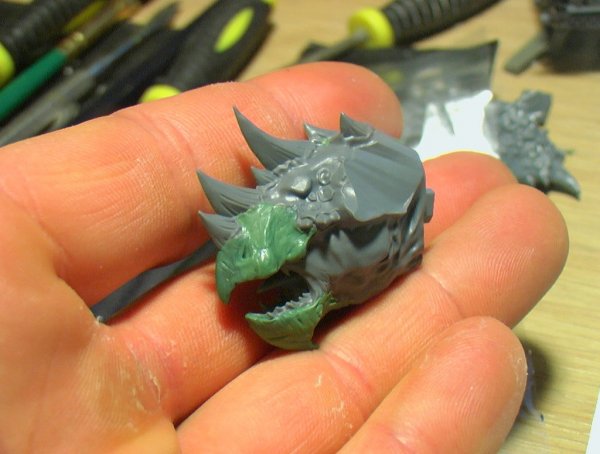
Going back to the head, my focus moves away from the snout and I being a rough structure for the eyes.


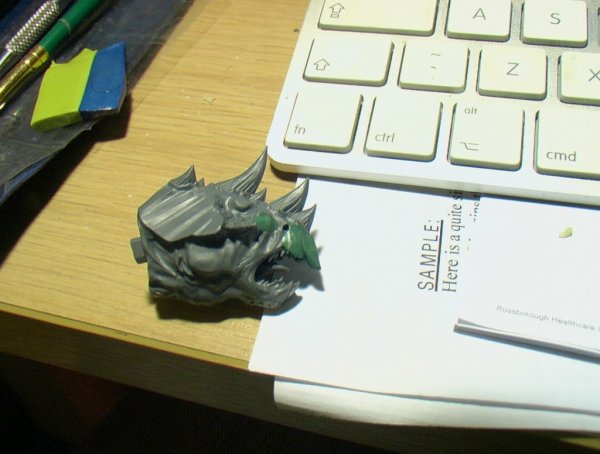
With the head already changing and the body not far behind, the crest will also need some adaptation, in this case it will need to be longer and spikes re-positioned.
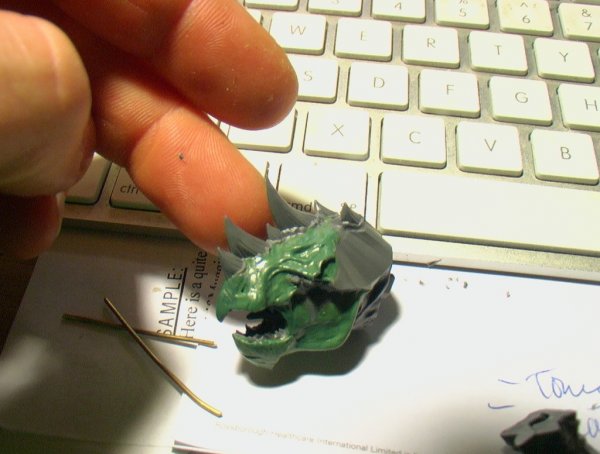
I then cut some of the spikes off completely (but do not throw them away), use apoxie sculpt to position the crest further away, give it a new structure and some stability for when I sculpt a detail layer on top. You can also see I've started adding in some more to the eye sockets with a layer of green stuff to form a rough upper orbital structure above the eye. There's also some sockets left for spikes and there will be more info on working around existing detail you wish to keep, in part two.

Quick and easy, or hard and time consuming
One thing I keep getting asked, is how long something takes me, something I never have an answer for, as there are so many variables and sometimes parts will take that much longer, not because I fouled up, but because they are WORTH taking the time to do.
What I mean by this is quick simple, there's always several ways to do something and as luck would have it, usually the much longer, more irritating way usually gives you the best finished result.
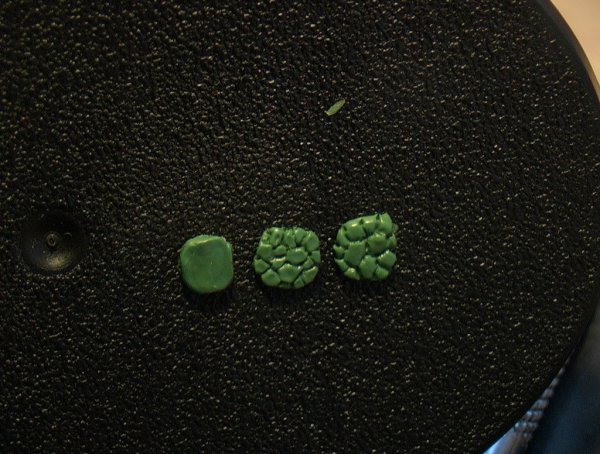
Take the images below, you have 3 blobs of green stuff, each one I've made as close to each other in terms of size as I can, I even timed myself for each one, wrote them down and....managed to lose it.
I do have a vague memory of these times, just remember they're not 100% accurate.
1: About 2 minutes, involves sticking it to the base and then making scale like shapes.
2: About 6 minutes, involves sticking it to the base, but making the shapes, smoothing the edges and using a clay shaper to create texture.
3: Pushing the 11 minute barrier, involves sticking individual scales to the base and shaping them. However you only end up using about two thirds of the green stuff to cover the same area.


That's all for the moment, admittedly I did start this project before the poll on conversions, so I figured it best to finish this first (completely) then move on to the next one.
This piece here is my starting point, I loved Primal rage as a kid and his work with it makes it all the more awesome.
The pose for Armadon was what grabbed me, the tail, the body, it really stands out, so I decided to emulate it using the pieces I already have, though this does require a large amount of chopping and changing (miniature chop shopping, but without the cars).
First part is nice and easy, stick bits which you need to go together, together.
Next stage requires drilling holes through the limbs and inserting brass wire before gluing and sealing them in place with glue and putty (apoxi sculpt).
Whilst waiting for this to dry I begin to change the head, bringing it back more to the original design of a frilled dinosaur, this not only includes the beak, but also moving the eyes to a more protected/realistic position on the head.
I begin to add contours and textures, as well as pits to the peak for nostrils.
Moving back to the rear end, I pin the legs on to the brass wire, leaving loads of space and gaps, but these (like the angles of the feet, detail and bony landmarks) will be getting sculpted on to and over at the detail stage. For the moment the focus is to simply build up a rough armature. Layers are applied with apoxie sculpt (far cheaper, easier and quicker than using green stuff at this scale) on top of thicker brass wire and then manipulated and re-shaped as it hardens.
Going back to the head, my focus moves away from the snout and I being a rough structure for the eyes.
With the head already changing and the body not far behind, the crest will also need some adaptation, in this case it will need to be longer and spikes re-positioned.
I then cut some of the spikes off completely (but do not throw them away), use apoxie sculpt to position the crest further away, give it a new structure and some stability for when I sculpt a detail layer on top. You can also see I've started adding in some more to the eye sockets with a layer of green stuff to form a rough upper orbital structure above the eye. There's also some sockets left for spikes and there will be more info on working around existing detail you wish to keep, in part two.
Quick and easy, or hard and time consuming
One thing I keep getting asked, is how long something takes me, something I never have an answer for, as there are so many variables and sometimes parts will take that much longer, not because I fouled up, but because they are WORTH taking the time to do.
What I mean by this is quick simple, there's always several ways to do something and as luck would have it, usually the much longer, more irritating way usually gives you the best finished result.
Take the images below, you have 3 blobs of green stuff, each one I've made as close to each other in terms of size as I can, I even timed myself for each one, wrote them down and....managed to lose it.
I do have a vague memory of these times, just remember they're not 100% accurate.
1: About 2 minutes, involves sticking it to the base and then making scale like shapes.
2: About 6 minutes, involves sticking it to the base, but making the shapes, smoothing the edges and using a clay shaper to create texture.
3: Pushing the 11 minute barrier, involves sticking individual scales to the base and shaping them. However you only end up using about two thirds of the green stuff to cover the same area.
That's all for the moment, admittedly I did start this project before the poll on conversions, so I figured it best to finish this first (completely) then move on to the next one.
Attachments
-
 classic_gods_of_urth_remake_by_iririv-d61yxue.jpg444.1 KB · Views: 28
 -
 aut_2060_by_the_build-d8efxvj.jpg140.9 KB · Views: 28
 -
 aut_2066_by_the_build-d8efxum.jpg147.6 KB · Views: 27
 -
 aut_2068_by_the_build-d8efxtq.jpg126.2 KB · Views: 27
 -
 aut_2070_by_the_build-d8efxrj.jpg135.7 KB · Views: 28
 -
 aut_2069_by_the_build-d8efxsj.jpg136.6 KB · Views: 28
 -
 aut_2071_by_the_build-d8efxqe.jpg175.6 KB · Views: 28
 -
 aut_2072_by_the_build-d8efxpi.jpg127.1 KB · Views: 28
 -
 aut_2073_by_the_build-d8efxox.jpg148.1 KB · Views: 28
 -
 aut_2075_by_the_build-d8efxmy.jpg195.7 KB · Views: 28
 -
 aut_2043_by_the_build-d8efxlt.jpg287.9 KB · Views: 27
 -
 aut_2044_by_the_build-d8efxko.jpg239.1 KB · Views: 28
 -
 aut_2045_by_the_build-d8efxjx.jpg273.6 KB · Views: 27
Slann
n810
First Spawning
- Messages
- 8,103
- Likes Received
- 6,527
- Trophy Points
- 113
Rikard said:I did toy with the idea of a Lizardmen MC unit for a while (ages ago), though it was for a revamp of the Horned ones, something with 3 wounds and D3 impact hits each.
Not massively sold on doing Pachycaphalosaurus cavalry, that would take me soooooo long to do and I personally think it would be more fun sculpting an entirely new unit, rather than existing dinosaurs.
If you end up going this route, you should check out the recently discovered "Dracorex",
it looks like a Cold one Should have looked.

Skink
talocofxhotl
Member
- Messages
- 42
- Likes Received
- 15
- Trophy Points
- 8
Rikard said:I did toy with the idea of a Lizardmen MC unit for a while (ages ago), though it was for a revamp of the Horned ones, something with 3 wounds and D3 impact hits each.
Not massively sold on doing Pachycaphalosaurus cavalry, that would take me soooooo long to do and I personally think it would be more fun sculpting an entirely new unit, rather than existing dinosaurs.
That's a shame - your stuff is stunning. Guess I'll have to get a move on with my Mortarion modifications then start learning how to do stuff from scratch!
n810 said:Rikard said:I did toy with the idea of a Lizardmen MC unit for a while (ages ago), though it was for a revamp of the Horned ones, something with 3 wounds and D3 impact hits each.
Not massively sold on doing Pachycaphalosaurus cavalry, that would take me soooooo long to do and I personally think it would be more fun sculpting an entirely new unit, rather than existing dinosaurs.
If you end up going this route, you should check out the recently discovered "Dracorex",
it looks like a Cold one Should have looked.
It's a sub genus of the Pachycaphalosaurus

Razordon
Kcibrihp-Esurc
Well-Known Member
- Messages
- 342
- Likes Received
- 435
- Trophy Points
- 63
Rikard said:-Ripperdactyls - converting the heads of the current terradons to make a decent looking beast - concept artwork already found
Rats! I was going to suggest the Rippers I'm planning, I'll be converting Tyranid Gargoyles into Ripperdactyls
Slann
n810
First Spawning
- Messages
- 8,103
- Likes Received
- 6,527
- Trophy Points
- 113
talocofxhotl said:Rikard said:I did toy with the idea of a Lizardmen MC unit for a while (ages ago), though it was for a revamp of the Horned ones, something with 3 wounds and D3 impact hits each.
Not massively sold on doing Pachycaphalosaurus cavalry, that would take me soooooo long to do and I personally think it would be more fun sculpting an entirely new unit, rather than existing dinosaurs.
That's a shame - your stuff is stunning. Guess I'll have to get a move on with my Mortarion modifications then start learning how to do stuff from scratch!
n810 said:Rikard said:I did toy with the idea of a Lizardmen MC unit for a while (ages ago), though it was for a revamp of the Horned ones, something with 3 wounds and D3 impact hits each.
Not massively sold on doing Pachycaphalosaurus cavalry, that would take me soooooo long to do and I personally think it would be more fun sculpting an entirely new unit, rather than existing dinosaurs.
If you end up going this route, you should check out the recently discovered "Dracorex",
it looks like a Cold one Should have looked.
It's a sub genus of the Pachycaphalosaurus
agreed, I just thought it was the best subs genus.
")
Jungle Swarm
warlordbob
New Member
- Messages
- 2
- Likes Received
- 0
- Trophy Points
- 0
I'm not sure if its been suggested, but I'd love to see your take on a Coatl, your skills are damned impressive with putty!
Stegadon
Rikard
Well-Known Member
- Messages
- 929
- Likes Received
- 1,464
- Trophy Points
- 93
warlordbob said:I'm not sure if its been suggested, but I'd love to see your take on a Coatl, your skills are damned impressive with putty!
One day perhaps, but not soon unfortunately, it would have to go to the back of a list of sculpts at least nine other pieces (that's just off the top of my head, not even including conversions).
I've re-activated my other log as it seems a good way of keeping everyone updated without huge amounts of smaller and probably not too helpful info.
Here's the link.
http://www.lustria-online.com/viewtopic.php?f=16&t=12297&p=121185#p121185
Cold One
woogity
Active Member
- Messages
- 102
- Likes Received
- 253
- Trophy Points
- 43
tutorial is coming along awesome man great ref sheet too, spent the better part of 3 years of my childhood in the local bowling alley on primal rage XD! do you have any suggestions for surfaces to use with greenstuff to minimize sticking? my experience with it is pretty limited but it is really annoying to have to have a medium that sticks to stainless steel tools.
Stegadon
Rikard
Well-Known Member
- Messages
- 929
- Likes Received
- 1,464
- Trophy Points
- 93
woogity said:tutorial is coming along awesome man great ref sheet too, spent the better part of 3 years of my childhood in the local bowling alley on primal rage XD! do you have any suggestions for surfaces to use with greenstuff to minimize sticking? my experience with it is pretty limited but it is really annoying to have to have a medium that sticks to stainless steel tools.
Good to see I'm not alone with my Primal rage fix.
As for the stickiness, I'd say the working ambient temperature of the room is a big factor, if you can try to aim for around for a little less. Green stuff tends to get more and more sticky at 20C upwards. I like using a lamp to heat up the surrounding area (where the putty and models sit) as it keeps your tools cooler.
Other options include a little more blue in the mix (just a small amount) or giving the GS about 30 minutes to sit first, after you've mixed it.
I should be getting back on track soon with any luck, I've been having more and more things I've been trying to sort out, doesn't always work out with minis, so I've had to take a few steps backwards.
I did find some AWESOME colour schemes though for some saurus and kroxigor characters.