-
The forum software have been upgraded to the latest version.
If you notice anything that looks off, or does not work, please let us know.
For more information, click here.
You are using an out of date browser. It may not display this or other websites correctly.
You should upgrade or use an alternative browser.
You should upgrade or use an alternative browser.
Tutorial How to sculpt lizardmen: All your base...
- Thread starter Rikard
- Start date
Stegadon
Rikard
Well-Known Member
- Messages
- 929
- Likes Received
- 1,464
- Trophy Points
- 93
I've no idea to be honest, think he may have been thrown out somewhere along the line.
Mistakes are something I'm thinking are worth including as it shows a fundamental part of sculpting; what to do when things go pear shaped. I'm going to do my best to show more.
Mistakes are something I'm thinking are worth including as it shows a fundamental part of sculpting; what to do when things go pear shaped. I'm going to do my best to show more.
Stegadon
Rikard
Well-Known Member
- Messages
- 929
- Likes Received
- 1,464
- Trophy Points
- 93
My apologies to @woogity,
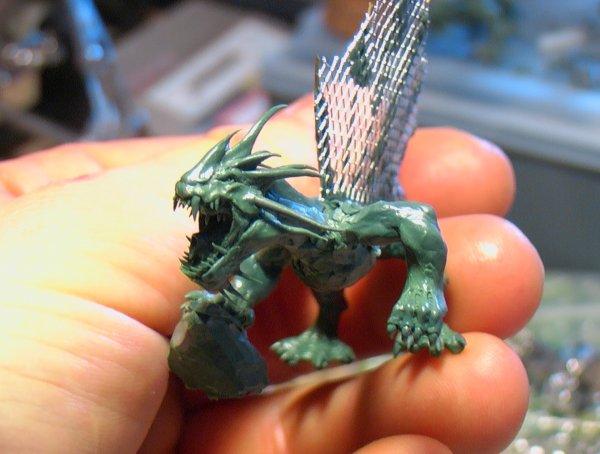
I promised updates ages ago, I have loads of other WIP shots, so will put them up later on today with explanations of the steps, although it's not finished yet, I think I've got over the harder parts (yup, feet again, something I'll cover in more detail).
I promised updates ages ago, I have loads of other WIP shots, so will put them up later on today with explanations of the steps, although it's not finished yet, I think I've got over the harder parts (yup, feet again, something I'll cover in more detail).
Attachments
Slann
NIGHTBRINGER
Second Spawning
- Messages
- 90,928
- Likes Received
- 278,906
- Trophy Points
- 113
Very nice work... as always!
Cold One
woogity
Active Member
- Messages
- 102
- Likes Received
- 253
- Trophy Points
- 43
no apologies nessecary! its looking awesome! loveing the monitor lizard double rows of teeth! great touch!My apologies to @woogity,
I promised updates ages ago, I have loads of other WIP shots, so will put them up later on today with explanations of the steps, although it's not finished yet, I think I've got over the harder parts (yup, feet again, something I'll cover in more detail).
Stegadon
Rikard
Well-Known Member
- Messages
- 929
- Likes Received
- 1,464
- Trophy Points
- 93
Small note here:
It's taking a little longer, finished about half of the tail, but trying some new techniques which at the moment are looking....very interesting (in a good way). So I'm pushing things a little further if people don't mind, but promise to stop short when it comes to the scale and the big sail on the back.
Thanks all for being so patient.
Will also be bringing in the Chicken 65 rule I keep talking about and a few other snippets on minimising having to re-do parts, or being dissatisfied with certain bits (like feet), something called the Sisyphus boulder co-efficient (yes, I'm coming up with more silly names for things, but it helps me remember them and may well do the same for you, also, it makes me feel important. ).
).
It's taking a little longer, finished about half of the tail, but trying some new techniques which at the moment are looking....very interesting (in a good way). So I'm pushing things a little further if people don't mind, but promise to stop short when it comes to the scale and the big sail on the back.
Thanks all for being so patient.
Will also be bringing in the Chicken 65 rule I keep talking about and a few other snippets on minimising having to re-do parts, or being dissatisfied with certain bits (like feet), something called the Sisyphus boulder co-efficient (yes, I'm coming up with more silly names for things, but it helps me remember them and may well do the same for you, also, it makes me feel important.
).
Skink Priest
pendrake
Well-Known Member
- Messages
- 3,764
- Likes Received
- 5,025
- Trophy Points
- 113
I think I understand this one ... the point where no amount of extra effort will make it better or push it to a higher level?the Sisyphus boulder co-efficient
Stegadon
Rikard
Well-Known Member
- Messages
- 929
- Likes Received
- 1,464
- Trophy Points
- 93
I think I understand this one ... the point where no amount of extra effort will make it better or push it to a higher level?
No,
I was thinking more along the lines of try, try, try again, or to be specific, break the boulder into small chunks and carry each one up the hill.
It's named more for a point of irony.
Feet for example are annoying on Lizardmen, but rather than try it in a set way, research it like crazy looking at different animals and do so until you can clearly visualise those feet in your head when you come to sculpting it.
Stegadon
Rikard
Well-Known Member
- Messages
- 929
- Likes Received
- 1,464
- Trophy Points
- 93
I've kind of (read: HAVE) copy and pasted this from DA as it took ages to type up (not including arbitrary procrastination).
Also @spawning of Bob, your wish is granted, the chicken 65 approach is revealed!
Well it's about that time again and so without further ado, here's the first major part of the Salamander sculpt I've been working on.
I'm still trying to streamline these tuts/ramblings down a little as I can get carried away with the details.
So....
This is a salamander (note: not an ACTUAL salamander, which is a shame, because if they were like this I would have at least five and some very burnt fingers....moving on...), it's another sub species/Razordon buddy. Though they're very different. A Salamander is an aquatic beasty, with a sail on it's back, that spits flames at things it wishes to nom.
As with the Razordon I'm going to break this down stage by stage.
What does a salamander DO?
What does a Salamander NEED?
This means:
Anywho, with that all out of the way, here's the armature, no idea why I thought about such a large base, but it made sense at the time. As always, I start at the head, as it ALWAYS makes or breaks the model and can often change your entire aim/overall concept for the piece.


Each new photo represents a brand new stage, usually when the one before has hardened completely or ever so slightly.
The chicken 65 approach....
The chicken 65 approach refers to something that happened at a local curry house.
We all have our food favs, things that are awesome (mine was tandoori), but just because you've found something that suits you, you'd be a fool not to try something new. Sticking to what works for you and what you know is not a good idea, as it means you only improve in that way, or that technique, when there COULD be simpler, or much better ways of achieving the same result).
This is where the name "Chicken 65" comes in.
I love Tandoori from the local Indian/Goan take away, but one day, I decided to try this weird sounding "chicken 65" on their menu....HOLY CRAP THAT STUFF IS AMAZING! It was so amazing I ate the chilis in the this dish as though they were peppers (consider that when I say that I am not a fire eater and do not get on well with spicy, throat burning food).
Despite my ears turning purple afterwards, I still regret nothing....
Anways, the point here is that in the past I've always made a brace to slide teeth up against, it works nicely, provided you don't have any gaps and you keep the spacings between teeth small. However I have more and more recently moved away from that and apply teeth now, one by one.
Yes, it's more annoying.
Yes, it takes longer.
BUT, it looks better when they're all in the mouth.

NEXT UP:
Moving on from the head, I then go to an old nemesis, the feet.
Starting from the bottom and working up helps to check your work as you go and it's much easier to correct mistakes too. This is where another little tip comes in to help,The Sisyphus boulder co-efficient (yes this is a real thing, stop questioning my awesomeness, you horribly negative balloon popper!)

Also @spawning of Bob, your wish is granted, the chicken 65 approach is revealed!
Well it's about that time again and so without further ado, here's the first major part of the Salamander sculpt I've been working on.
I'm still trying to streamline these tuts/ramblings down a little as I can get carried away with the details.
- I've skipped over the building of the armature, however what I've said in the past still stands, it's all part of thought for what the creature is, what you want it to do and then finally, what it needs to do.
So....
This is a salamander (note: not an ACTUAL salamander, which is a shame, because if they were like this I would have at least five and some very burnt fingers....moving on...), it's another sub species/Razordon buddy. Though they're very different. A Salamander is an aquatic beasty, with a sail on it's back, that spits flames at things it wishes to nom.
As with the Razordon I'm going to break this down stage by stage.
What does a salamander DO?
- Aquatic beasty with a sail on it's back, that spits fire...that's it.
What does a Salamander NEED?
- If you have to spit fire you need several things, the first is two different glands that mix two chemicals that violently react. (similar to the way the bombardier beetle works).
- You need a large set of jaws, realistically ones that can open very wide.
- Being aquatic means you need big paddle like paws/feet, including webbing, all the better for swimming quickly through the water.
- This also means a big rudder like tail.
- And of course, broader shoulders and a wide chest.
- Salamanders are (overall) considered fairly closely with Razordons.
- GW has a tendency to do combi-kits (kits with enough to make two different kinds of units, but of course, not enough to make both, as some major parts like legs and chests are required to make either option).
- I want to further these gaps, overall body shape, even without details, NEED to be different from one another as they're completely different beastys.
- Even the teeth would need to be different, thinner and longer (assuming it eats river dwelling things like fish, these teeth would be more useful.
This means:
- Longer limbs.
- Broader at the front, rather than the back.
- Longer neck.
- Thicker arms + legs.
Anywho, with that all out of the way, here's the armature, no idea why I thought about such a large base, but it made sense at the time. As always, I start at the head, as it ALWAYS makes or breaks the model and can often change your entire aim/overall concept for the piece.
- There's going to be some frilly areas, so it makes sense again (after the base layer of the upper head is complete), to plot at least two, these also help act as markers for the back of the head as I build it up.
- Next stage is working in the sneer/growl of the salamander and the underside of the lower eyelid.
- I can then slide in the eye balls, let it dry and then finish the top part of the skull and add in some more frills.
Each new photo represents a brand new stage, usually when the one before has hardened completely or ever so slightly.
The chicken 65 approach....
The chicken 65 approach refers to something that happened at a local curry house.
We all have our food favs, things that are awesome (mine was tandoori), but just because you've found something that suits you, you'd be a fool not to try something new. Sticking to what works for you and what you know is not a good idea, as it means you only improve in that way, or that technique, when there COULD be simpler, or much better ways of achieving the same result).
This is where the name "Chicken 65" comes in.
I love Tandoori from the local Indian/Goan take away, but one day, I decided to try this weird sounding "chicken 65" on their menu....HOLY CRAP THAT STUFF IS AMAZING! It was so amazing I ate the chilis in the this dish as though they were peppers (consider that when I say that I am not a fire eater and do not get on well with spicy, throat burning food).
Despite my ears turning purple afterwards, I still regret nothing....
Anways, the point here is that in the past I've always made a brace to slide teeth up against, it works nicely, provided you don't have any gaps and you keep the spacings between teeth small. However I have more and more recently moved away from that and apply teeth now, one by one.
Yes, it's more annoying.
Yes, it takes longer.
BUT, it looks better when they're all in the mouth.
NEXT UP:
Moving on from the head, I then go to an old nemesis, the feet.
Starting from the bottom and working up helps to check your work as you go and it's much easier to correct mistakes too. This is where another little tip comes in to help,The Sisyphus boulder co-efficient (yes this is a real thing, stop questioning my awesomeness, you horribly negative balloon popper!)
Last edited:
Stegadon
Rikard
Well-Known Member
- Messages
- 929
- Likes Received
- 1,464
- Trophy Points
- 93
Anyways, the premise is simple, if you're going to push a great boulder up a hill, you might as well invest in some good shoes, practice with smaller rocks first, or even better, blow it up and take the bits up one by one (or get/pay someone else to do it). In this instance it's about looking at similar creatures and art, heck, even mechanics of the bones of feet of similar creatures, so you don't end up with an entire army of creatures, all with the exact same style of foot.

The tail is next and rather than try to do it in one go, it's better to do the stage thingy again, especially as there's going to be a fair amount of shape and purpose to the tail.
This involves loads of that irritating "push-pulling" stuff to centre the masses where I need them and make some frilly areas and textures.


Appropriate:

Not so appropriate:

The Torso:
Once that's dried, it's time to move from the underside of the torso to the upper, admittedly, more will be seen of the upper, so it makes a little more sense (especially while most of the tail is still wet) to get a basic layer on and push in some general shapes (muscles, scapular and rib cage).
Last photo shows a little more frill work, though much of it is pondering where to put stuff.


That's all for the moment, hope this has been as alarming as it was enlightening.
More soonish/possibly/I make no promises.
- From the feet I then work up the legs/arms.
- Small divot holes are left into which I can stick and shape blobs of green stuff to make claws when the feet are dry.
- After this, I then add the webbing in-between the toes, at this stage it does matter about visible joins between separate layers of green stuff, these get fixed up in a sort of path and fill stage at the end(ish) of the project.
The tail is next and rather than try to do it in one go, it's better to do the stage thingy again, especially as there's going to be a fair amount of shape and purpose to the tail.
This involves loads of that irritating "push-pulling" stuff to centre the masses where I need them and make some frilly areas and textures.
- As a side note here, the tail in particular is something that would be important for a real life creature, just make sure you use the appropriate Salamander.
Appropriate:
Not so appropriate:
The Torso:
Once that's dried, it's time to move from the underside of the torso to the upper, admittedly, more will be seen of the upper, so it makes a little more sense (especially while most of the tail is still wet) to get a basic layer on and push in some general shapes (muscles, scapular and rib cage).
Last photo shows a little more frill work, though much of it is pondering where to put stuff.
That's all for the moment, hope this has been as alarming as it was enlightening.
More soonish/possibly/I make no promises.
Last edited:
Slann
NIGHTBRINGER
Second Spawning
- Messages
- 90,928
- Likes Received
- 278,906
- Trophy Points
- 113
Stegadon
Rikard
Well-Known Member
- Messages
- 929
- Likes Received
- 1,464
- Trophy Points
- 93
@Rikard Any idea of when your Salamander might be finished & cast? Would it be sold through Avatars of War? Would it be cast in metal, plastic or resin?
No idea to be honest,
Even if I'd finished it and sent it tomorrow morning, you'd still be looking at a week before I get a decision back from the company and then anywhere from 2-3 months or more before you saw it hit the shelves.
A problem I hit once or twice with Felix, was the model I did was too big to be cast (me getting carried away).
As of yet I have/had no plans for it beyond a couple of private casts, but now I'm not so sure....Same goes for the Razordon, what I'll do is have a word with a few people and see if it's worth the hassle (or potential hassle, this can involve anything and everything from angry messages from other companies/individuals, whether it's financially viable, for both myself and the company/person who buys it and the risk of whether there would be any demand for it, that last one is a big one).
I'll let you all know, but for the moment I'm going to say it won't be cast, mainly because I'd much rather say no and then end up saying yes, rather than the other way round.
Slann
NIGHTBRINGER
Second Spawning
- Messages
- 90,928
- Likes Received
- 278,906
- Trophy Points
- 113
No idea to be honest,
Even if I'd finished it and sent it tomorrow morning, you'd still be looking at a week before I get a decision back from the company and then anywhere from 2-3 months or more before you saw it hit the shelves.
A problem I hit once or twice with Felix, was the model I did was too big to be cast (me getting carried away).
As of yet I have/had no plans for it beyond a couple of private casts, but now I'm not so sure....Same goes for the Razordon, what I'll do is have a word with a few people and see if it's worth the hassle (or potential hassle, this can involve anything and everything from angry messages from other companies/individuals, whether it's financially viable, for both myself and the company/person who buys it and the risk of whether there would be any demand for it, that last one is a big one).
I'll let you all know, but for the moment I'm going to say it won't be cast, mainly because I'd much rather say no and then end up saying yes, rather than the other way round.
Thanks for the update. I have my fingers crossed... here's hoping that it does make it to the shelves. I need a couple of salamanders!

Saurus
Korhedron
Member
- Messages
- 50
- Likes Received
- 6
- Trophy Points
- 8
Hey Rikard? Your work is so good.
Maybe it's "just repeatedly trying", but damn if I ever would develop the aptitude you have for this. I really like your reasoning behind the design decisions with the salamander/razordon. If you end up casting, I'd be down for several razordons, at least one sally and saurus project. No matter where new Warhammer takes us. Those would be a pleasure to field even if only for "old school" battles, years down the line!
Maybe it's "just repeatedly trying", but damn if I ever would develop the aptitude you have for this. I really like your reasoning behind the design decisions with the salamander/razordon. If you end up casting, I'd be down for several razordons, at least one sally and saurus project. No matter where new Warhammer takes us. Those would be a pleasure to field even if only for "old school" battles, years down the line!
Skink
StegadonSheperd
Member
- Messages
- 35
- Likes Received
- 20
- Trophy Points
- 8
Your work is great!
An inspiration to the rest of us, and most of all i saw that you decided to sculpt one of my favorite warhammer miniatures,
based on one of my very favorite videogame charakters...(was just replaying PR yesterday on MAME)")
It's an impressive work, all of it, but i wanted to ask specifikally if there are any news on the Stegadon
.....
I Know that probably will never happen but, if it went commercial, i would buy it, no matter my tight finances...
An inspiration to the rest of us, and most of all i saw that you decided to sculpt one of my favorite warhammer miniatures,
based on one of my very favorite videogame charakters...(was just replaying PR yesterday on MAME)
It's an impressive work, all of it, but i wanted to ask specifikally if there are any news on the Stegadon
.....
I Know that probably will never happen but, if it went commercial, i would buy it, no matter my tight finances...
Stegadon
Rikard
Well-Known Member
- Messages
- 929
- Likes Received
- 1,464
- Trophy Points
- 93
Maybe it's "just repeatedly trying", but damn if I ever would develop the aptitude you have for this. I really like your reasoning behind the design decisions with the salamander/razordon. If you end up casting, I'd be down for several razordons, at least one sally and saurus project. No matter where new Warhammer takes us. Those would be a pleasure to field even if only for "old school" battles, years down the line!
That's reassuring to hear about old school battles even if things don't go well.
As for the sculpting side of things, IF (big IF) I ever get the time I'll try and film short sculpting sessions to show how it's done, I think my descriptions aren't too bad, but sometimes it almost feels like people don't believe me when I say it's nowhere near as hard as they think.
Your work is great!
An inspiration to the rest of us, and most of all i saw that you decided to sculpt one of my favorite warhammer miniatures,
based on one of my very favorite videogame charakters...(was just replaying PR yesterday on MAME)
It's an impressive work, all of it, but i wanted to ask specifikally if there are any news on the Stegadon
.....
I Know that probably will never happen but, if it went commercial, i would buy it, no matter my tight finances...
Thanks!
Nothing new as of yet, probably some this weekend, I've ordered more Green stuff as there's actually a huge amount needed for the work. Unfortunately I can't cast him, he contains parts from existing kits and GW would flip their lid if I tried.
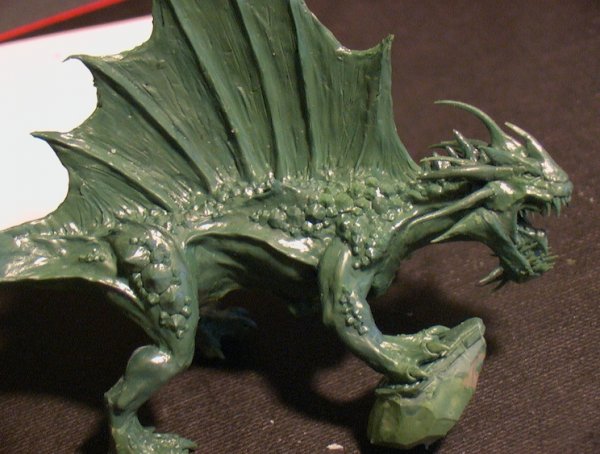
Small update, Salamander will be finished soon, almost all the scales (none on tail yet) done on one side of the body.
Attachments
Slann
Crowsfoot
Guardian of Paints
- Messages
- 8,344
- Likes Received
- 14,496
- Trophy Points
- 113
Thanks for the update. I have my fingers crossed... here's hoping that it does make it to the shelves. I need a couple of salamanders!
+1
